It’s Time for a DIY
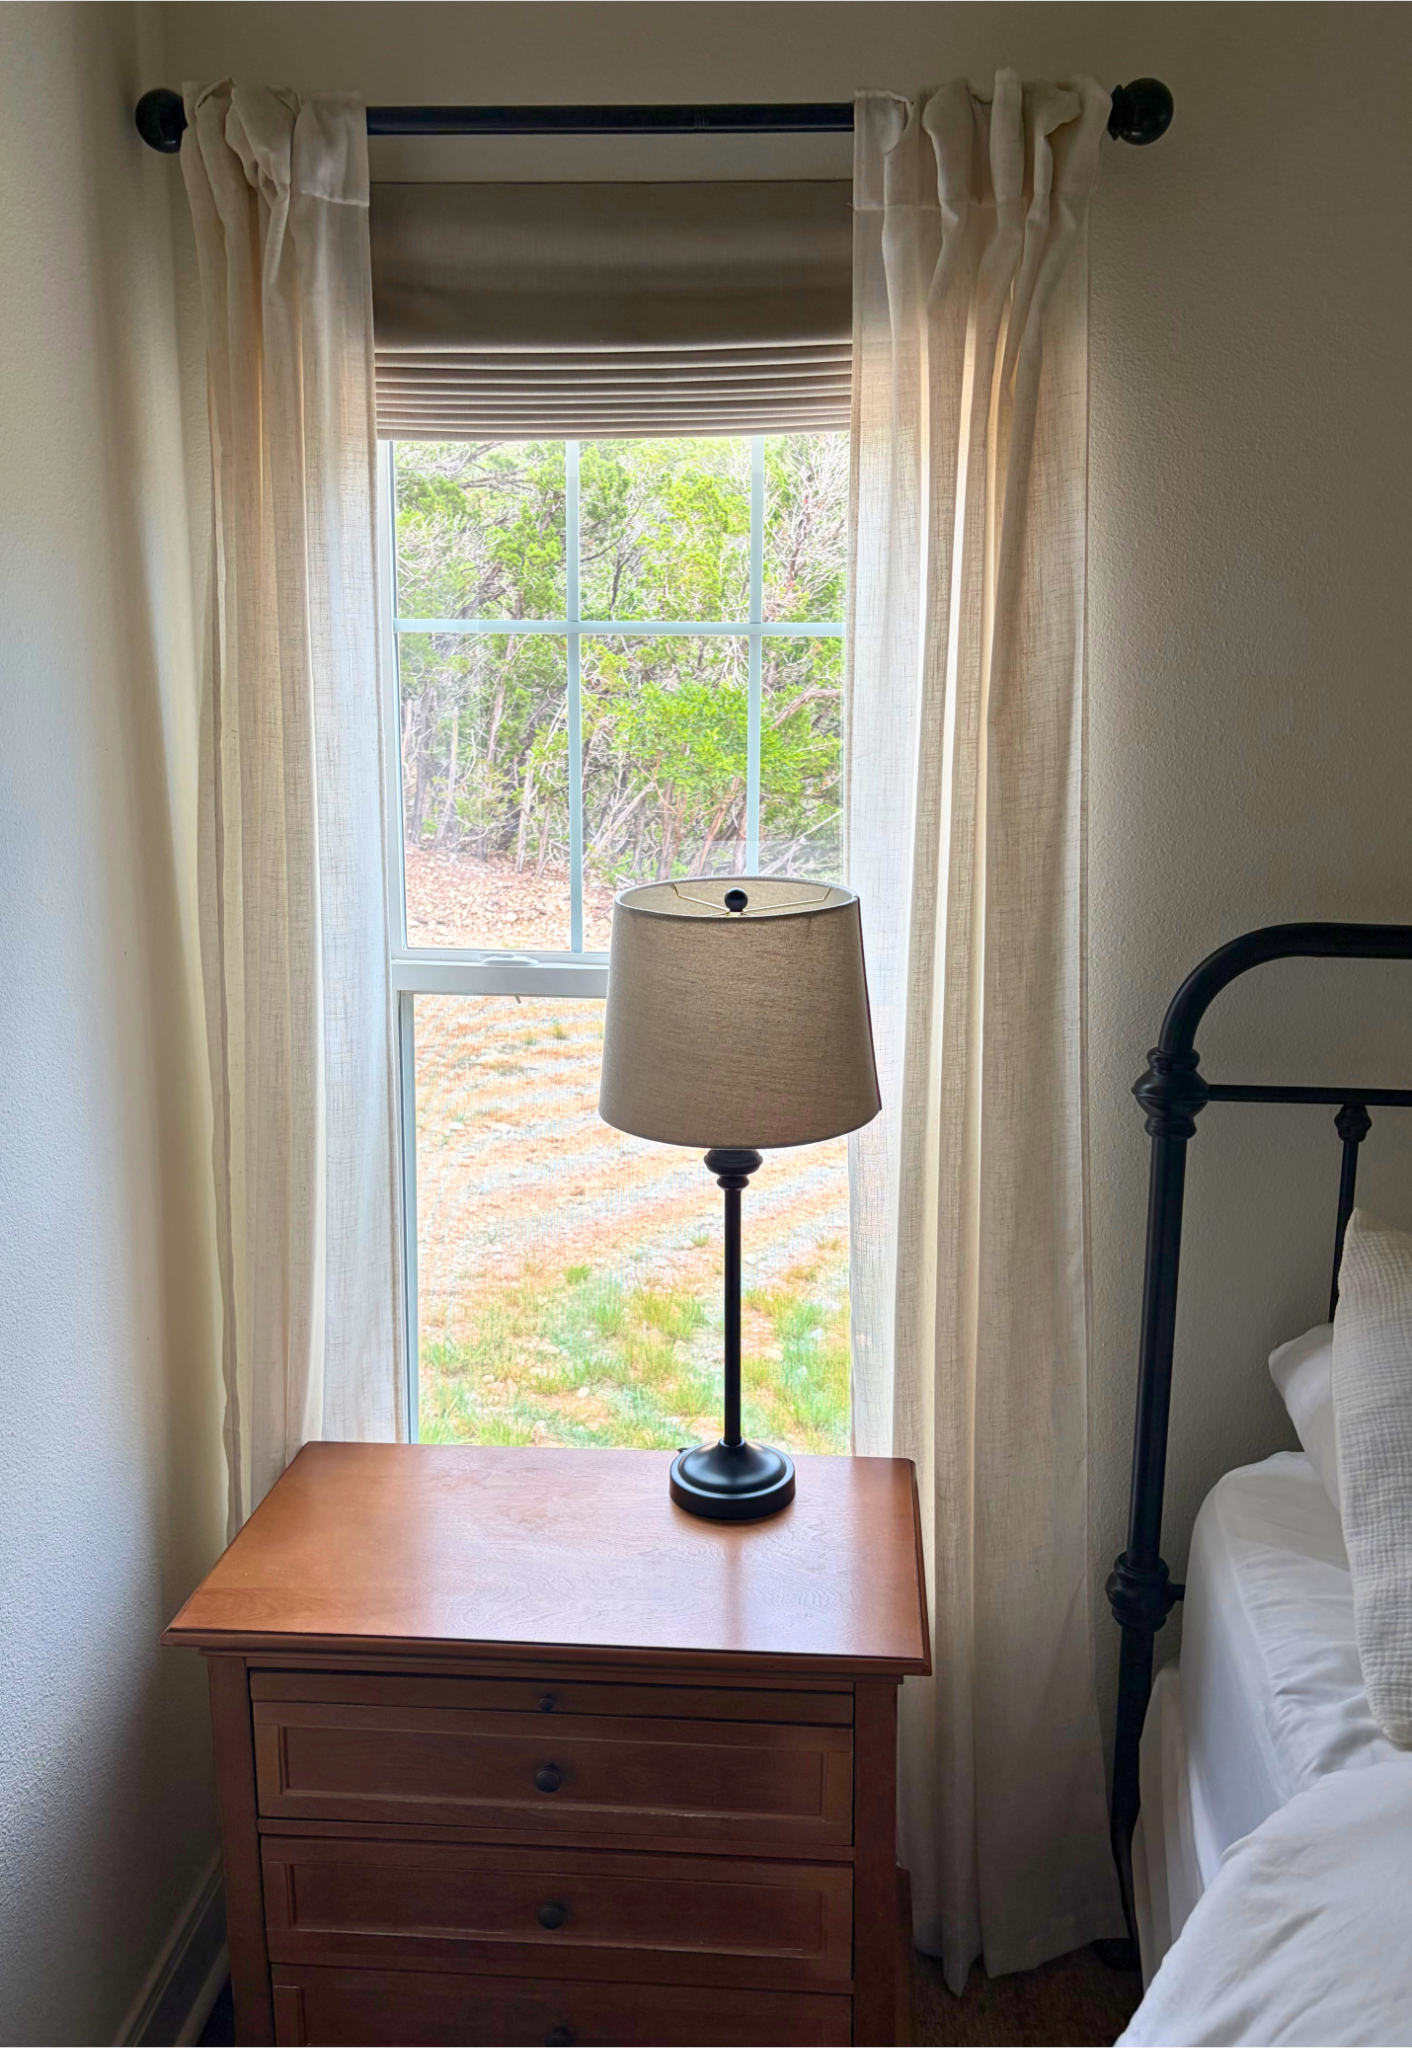
My first DIY post and it’s about time! I’ve been talking about my daughter’s bedroom on the blog for the last couple of weeks and one of my favorite parts of her room is the theme of lambs/sheep. Lambs are such a subtle, soft, and sweet accent perfect for any nursery or child’s room. It’s also a theme that is easy to transition from a baby’s nursery to an adorable toddler’s room. One little corner of my daughter’s room is full of whimsy with a children’s lamb mobile handmade by yours truly that used to sit over her crib and now sits over her big girl bed. If you are interested in how I made it so that you can create your own mobile too then keep reading!
Disclosure: This post may contain affiliate links. As an Amazon Associate, I earn from qualifying purchases at no additional cost to you. For more information, please see our Affiliate Disclosure.
The Inspiration for the Children’s Lamb Mobile
When we began decorating our daughter’s nursery I began a search for a mobile to place over her crib. If you’ve read my other post about my daughter’s nursery you will know that we weren’t able to have, and therefore decorate, a traditional nursery for our daughter. When we finally moved into our home where her official nursery would be she was already a year and a half old but she still slept in a crib and I still wanted to create the nursery I never got to make.
Because my daughter was a bit older I wanted to find a mobile that could easily grow with her and be used as decor in her big girl room in addition to being a crib mobile initially at the start. I also knew that I wanted the mobile to be part of the lamb theme for our daughter’s room so I set out to find a mobile that matched all of my specifications.
The Problem
I found the perfect mobile from a seller on Etsy. I can no longer find the seller or the item I wanted to buy but let’s just say I couldn’t afford the mobile no matter how much I loved it. While I saw a lot of lamb mobiles online this one just had something about it that I really liked. It had a cozy, soft, and sweet look to it. The lambs were cute but not cartoon like, so it had a maturity to it that would grow well with my daughter. It also was neutral with the soft colors and textures I was looking for. I started doing a deep dive on this mobile and discovered that the technique used to make it was needle felting and so began my journey into needle felting and DIYing my very own lamb mobile.
Needle Felting
What is needle felting? This was the first thing that popped into my head as I’d never heard of it before. To my surprise a lot of decorative pieces are made using needle felting. In fact, because vintage style items are all the rage right now needle felting is pretty big currently. If you’ve seen the felted looking Christmas ornaments, felt knickknacks and tabletop decor, felt garlands, felt stockings, and even dryer balls are all thanks to the art of needle felting. I’ve even seen night lights made of felt!
Needle felting is a process of taking wool and a specific needle felting needle that has small barbs on it that hooks into the fibers of the wool. As you repeatedly poke the wool with the needle the fibers lock together getting tighter and tighter the more you cause friction by poking with the needle. It sounds sort of funny but it’s a really satisfying craft and there are some really impressive pieces people have made.
Learning Needle Felting
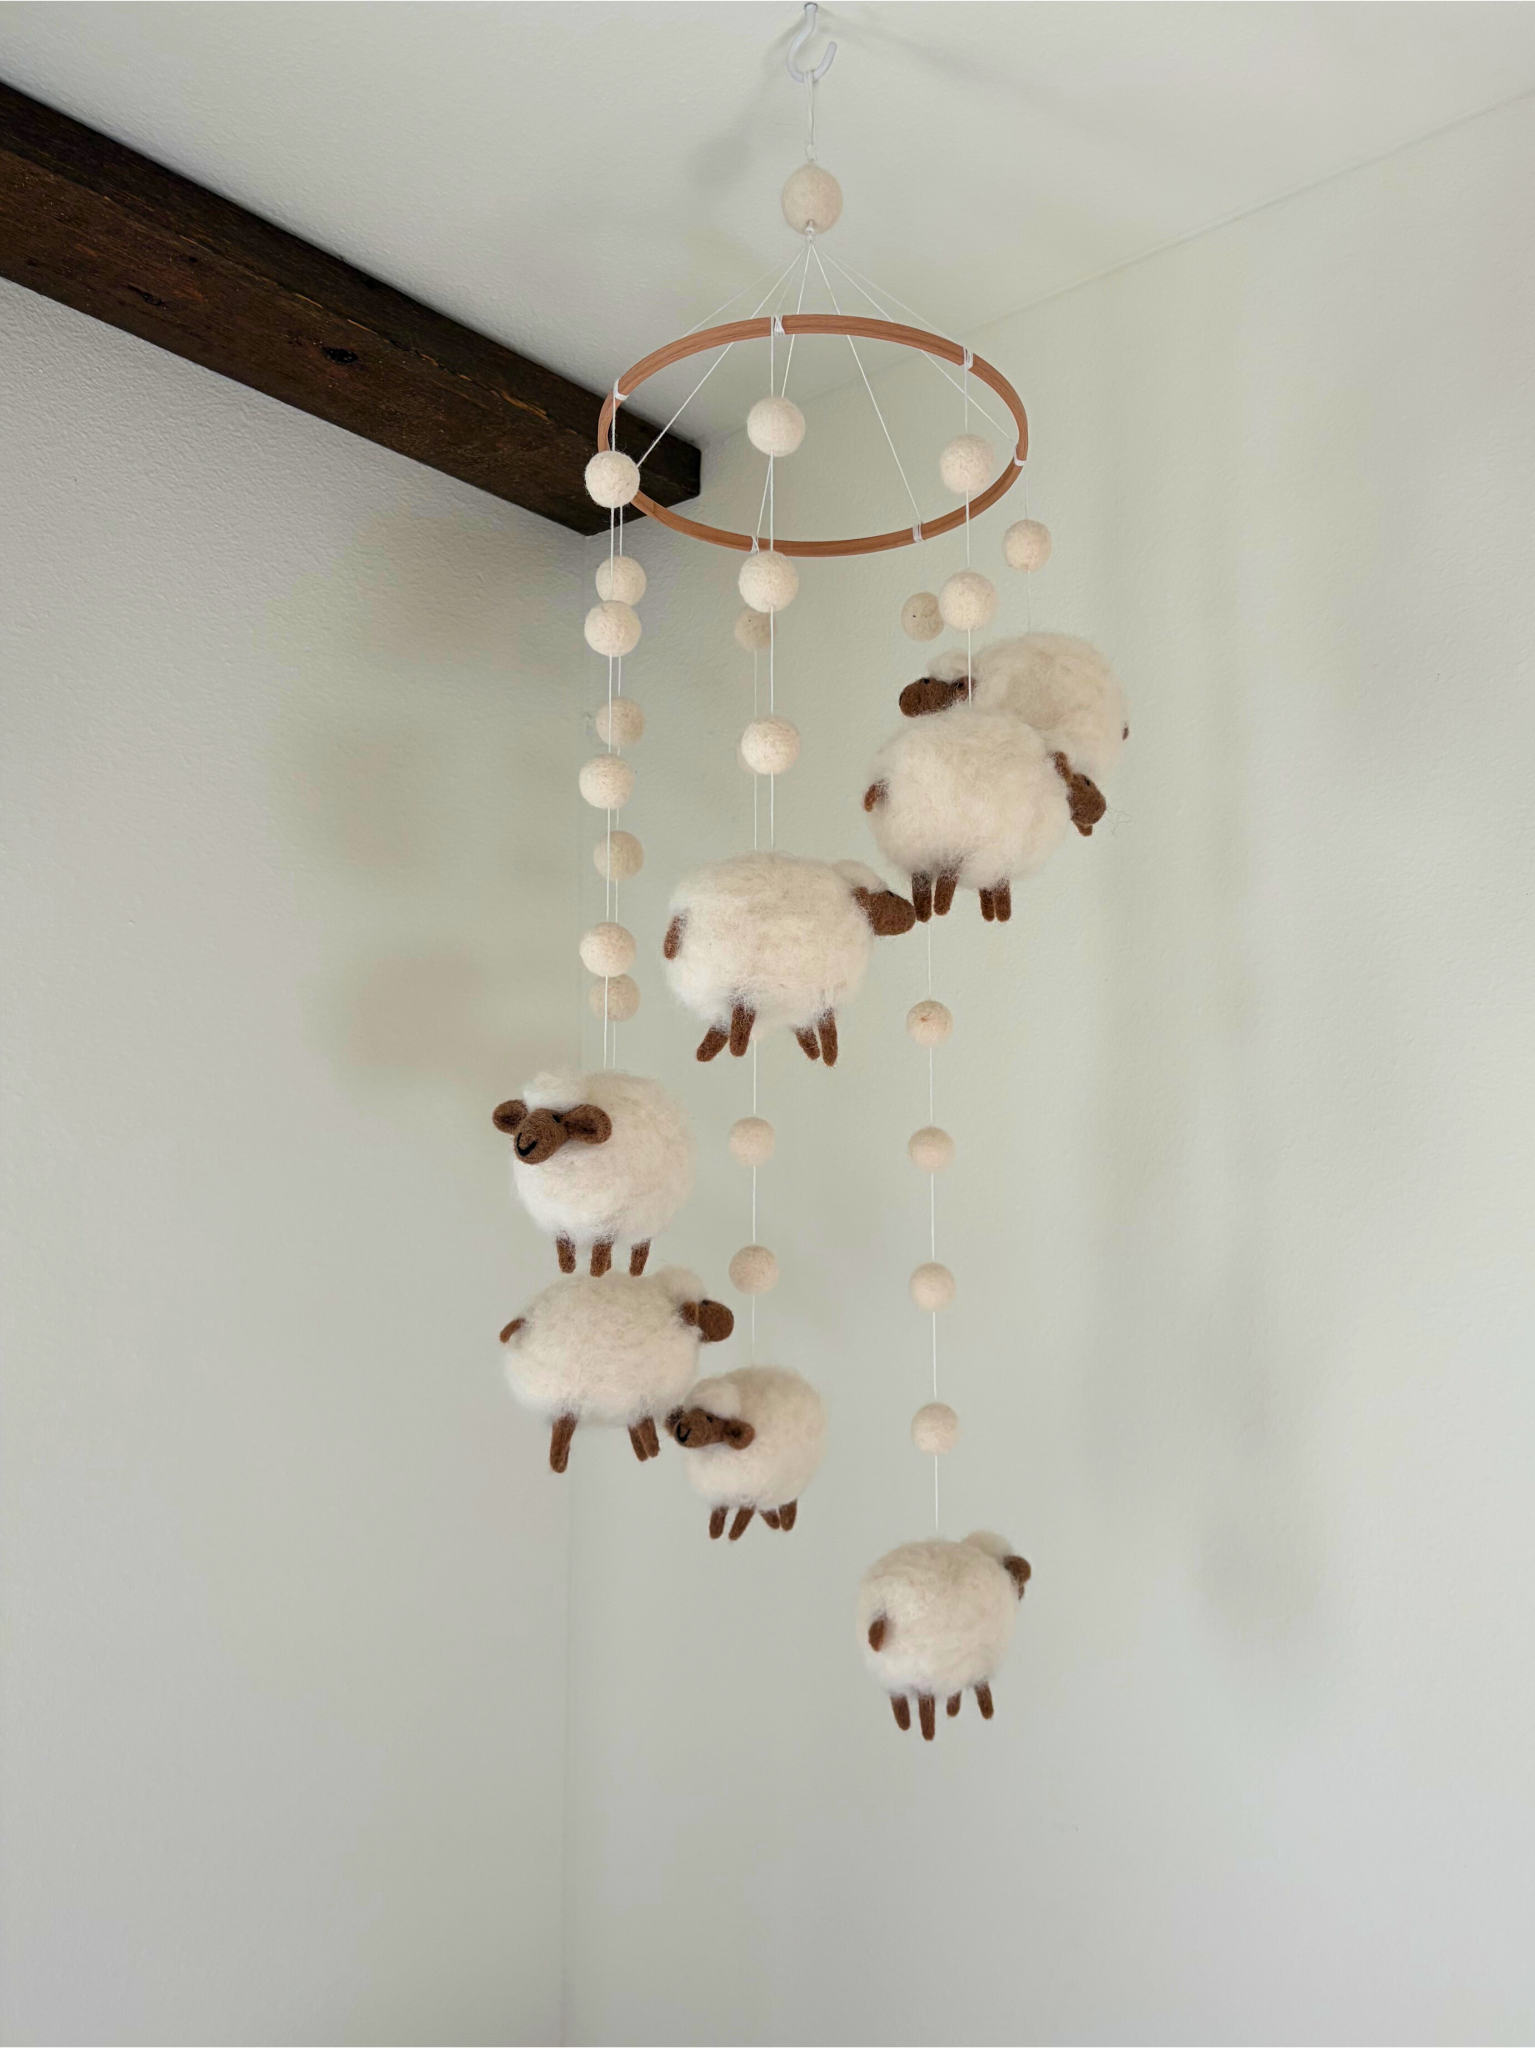
For my needs I wanted to learn the basics so I could make pretty simple shapes and figures. I took inspiration from some of the mobiles I saw online and decided to go with a design that required seven strands that would cascade down in a circle. Each strand would get longer as it went around the mobile. This will all make a lot more sense if you look at the pictures and keep reading for the supplies needed and breakdown of the parts of the mobile.
Learning the art of needle felting with my needs in mind was pretty straightforward. I found a few videos I watched on YouTube and with a bit of practice muddled my way through it. The first initial shapes were creating small balls and those were pretty simple to make. I will say the process can take a while especially if you want a firm and hardy structure and there is a risk of stabbing yourself with the needle which I did a lot! But the war wounds were well worth it!
Supplies You’ll Need
For any needle felting project you’ll of course need some basic pieces. Below I will share the specific items I purchased for general needle felting and the items selected for the lamb mobile. Everything can be found on Amazon making this project even simpler and more attainable.
– Needle Felting Kit –
You can buy needle felting pieces separately, especially if you want to become a skilled needle felter and would like higher end pieces, but for my needs and to see if I even liked the craft in general I opted for a well reviewed kit that contained all the basic pieces I would need to get started in the craft and to complete my project. I will say the project may have gone faster if I’d invested in a needle tool containing multiple needles (like this one) so that you can create more friction much quicker but I still completed the project with only the needles in the kit. If you don’t go with a kit be sure to purchase several needles with different gauges, a mat, and perhaps a finger protector (to prevent stabbing yourself too much).
– Wool –
For my particular project I needed a good amount of plain white wool. I would be using the white wool for the body of the sheep, the fur that would cover the sheep’s bodies, and I planned to make small balls that would hang above each of the sheep. I would need a good number of the balls because I planned to do the same number of balls as the step down of strands one through seven. For example, on the first strand there would be one ball above the sheep but as the strands cascaded down longer and longer by the time you got to strand seven there would be seven balls above the sheep.
I also would need one final large ball at the very top of the mobile that would bring all the strings together and create a hook to hang the mobile from the ceiling. Because of the large quantity of wool I needed I ended up buying two packages of this wool from Amazon. In hindsight, I probably could have gotten the 15.7 oz package versus two of the 8 oz packages, but as a new needle felter and just making up the project as I went I was not sure how much wool I’d need initially.
– Additional Wool –
While the bulk of my project required the plain white wool I would also need a brown wool for the heads, ears, feet, and tails of the lambs. I also would need black felt to create eyes and a nose on each sheep. I struggled to find a brown I really liked and I also wanted to find a small amount of black as I would only need a little since the features were so small and would require very little wool.
Unfortunately, I struggled to find affordable wool in the colors I liked and in the amounts I needed so I opted for this package of eight different colors. The package was not incredibly pricey, I got a lot of bang for my buck as I would have more wool for future projects as I was finding I enjoyed needle felting, and I liked the multi tones of brown as I could pick my favorite once I saw them in person. I did have to buy three packages in the end, so again there is probably a better option out there if you don’t want to purchase three packages of wool. I had plenty of the black shade but I only used one brown shade and ran out hence the two additional packages.
– Embroidery Floss –
In order to hang the mobile and to create the strands of the mobile I needed some sort of string. I initially thought about a clear string like fishing wire, but I really wanted an airy and soft feel to the mobile and felt that the clear string would come across more modern and not drape the same way. While I did not want the thread to be overly noticeable I ended up opting for a white embroidery floss. It was thick enough to hold the weight of the mobile, soft and airy for the look and feel I was going for, easy to push through the wool and to tie off, and because it was a similar shade of white to my daughter’s walls it would blend in enough where it would not be too noticeable (the main reason I had considered clear string).
– Embroidery Hoops –
The last item needed to complete the lamb mobile is the hoop for the mobile. I wanted a traditional shape that would allow for a circular mobile that would be a typical size but allow plenty of space for the cascading sheep. I ended up choosing this 9 inch embroidery hoop. You won’t need the outer hoop as I used only the inner hoop so that there was no hardware. I loved the color of the hoops and the fact that they are wood. I felt the wood would go well in my daughter’s room and while a lighter wood than the rest of the space it again felt light and airy and blended in making the sheep stand out.
Creating the Mobile
1. Lamb Bodies
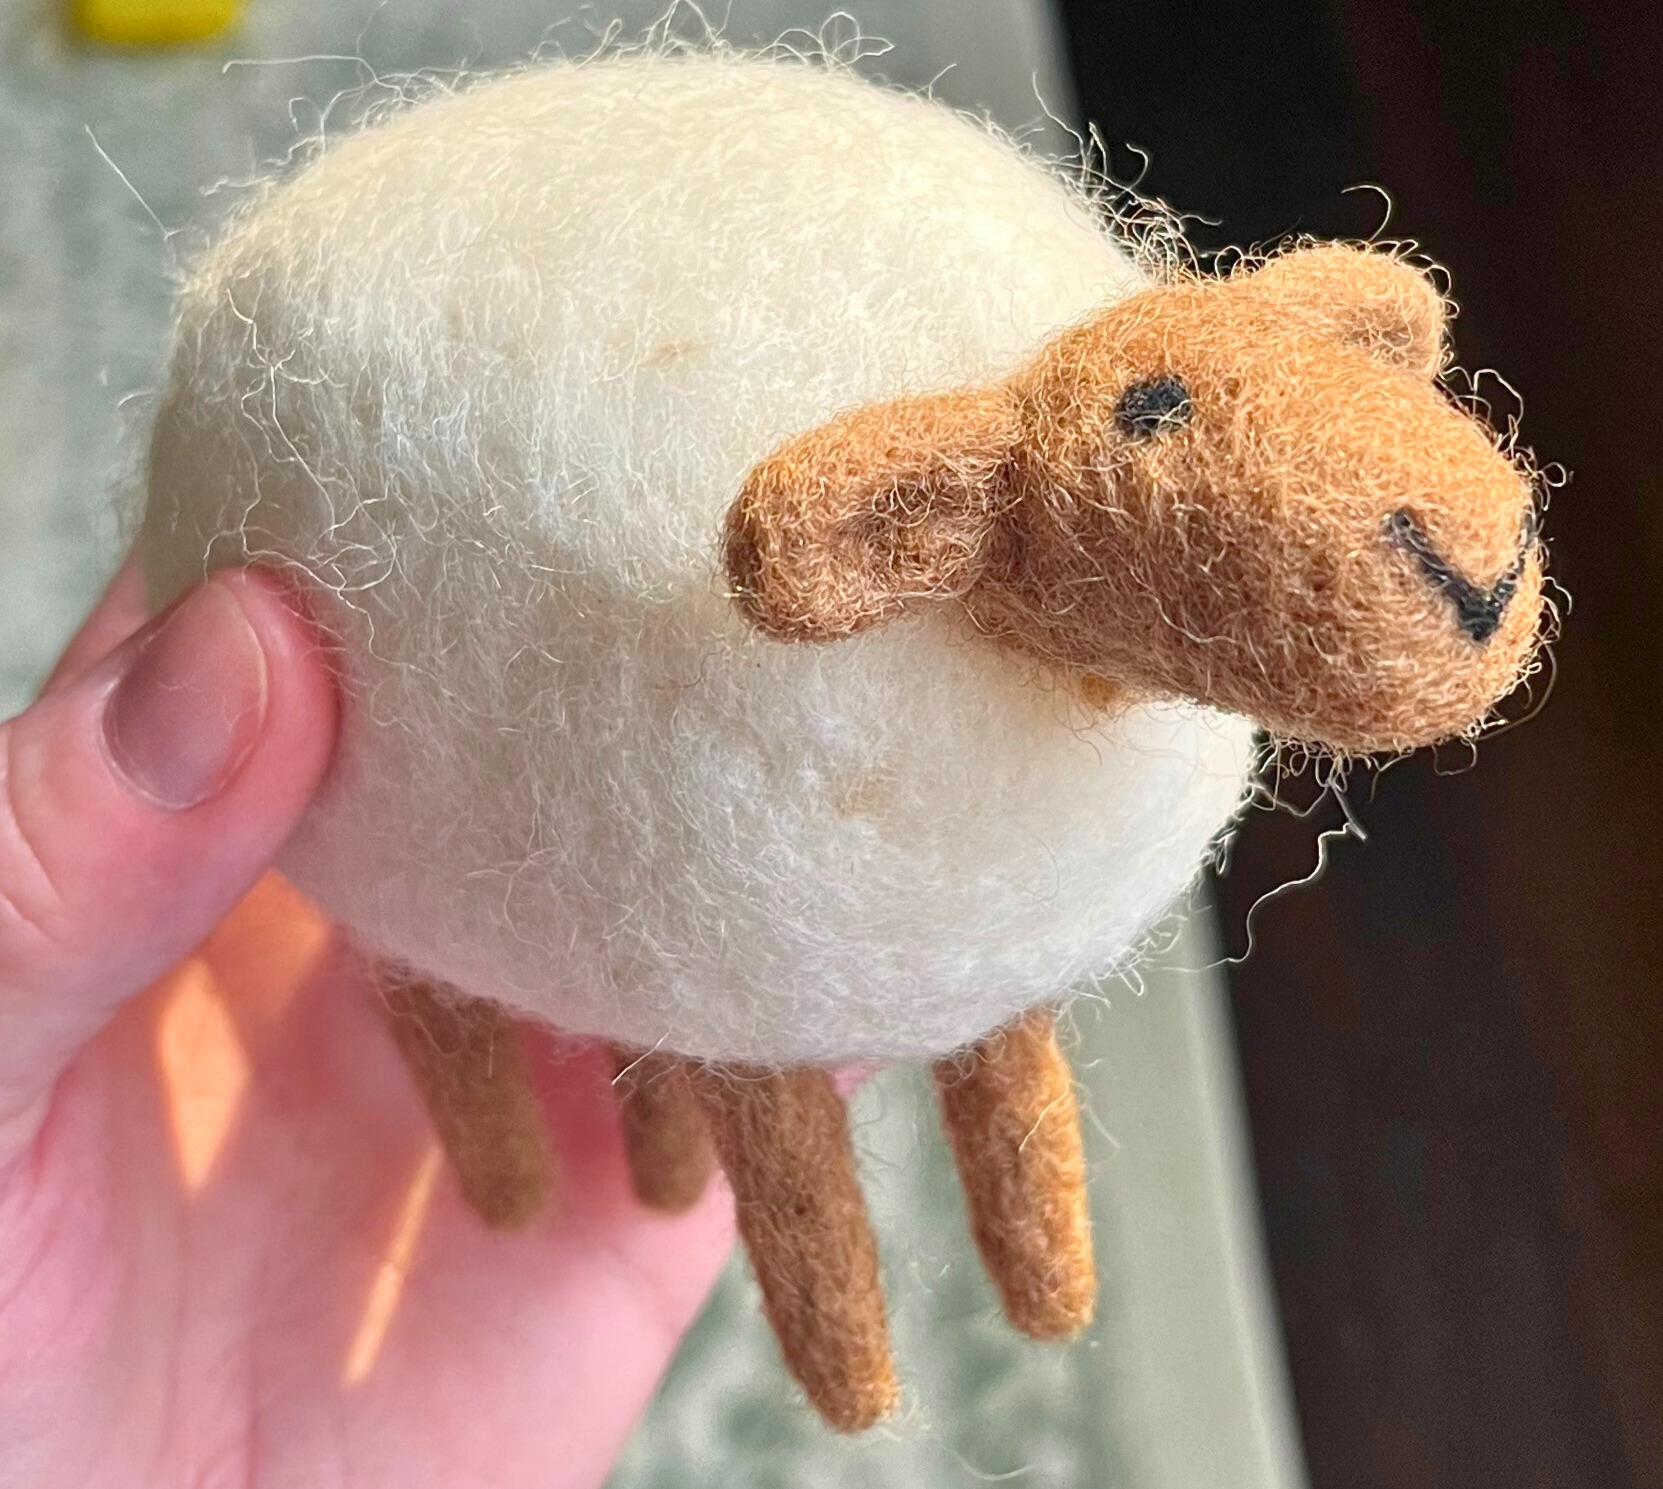
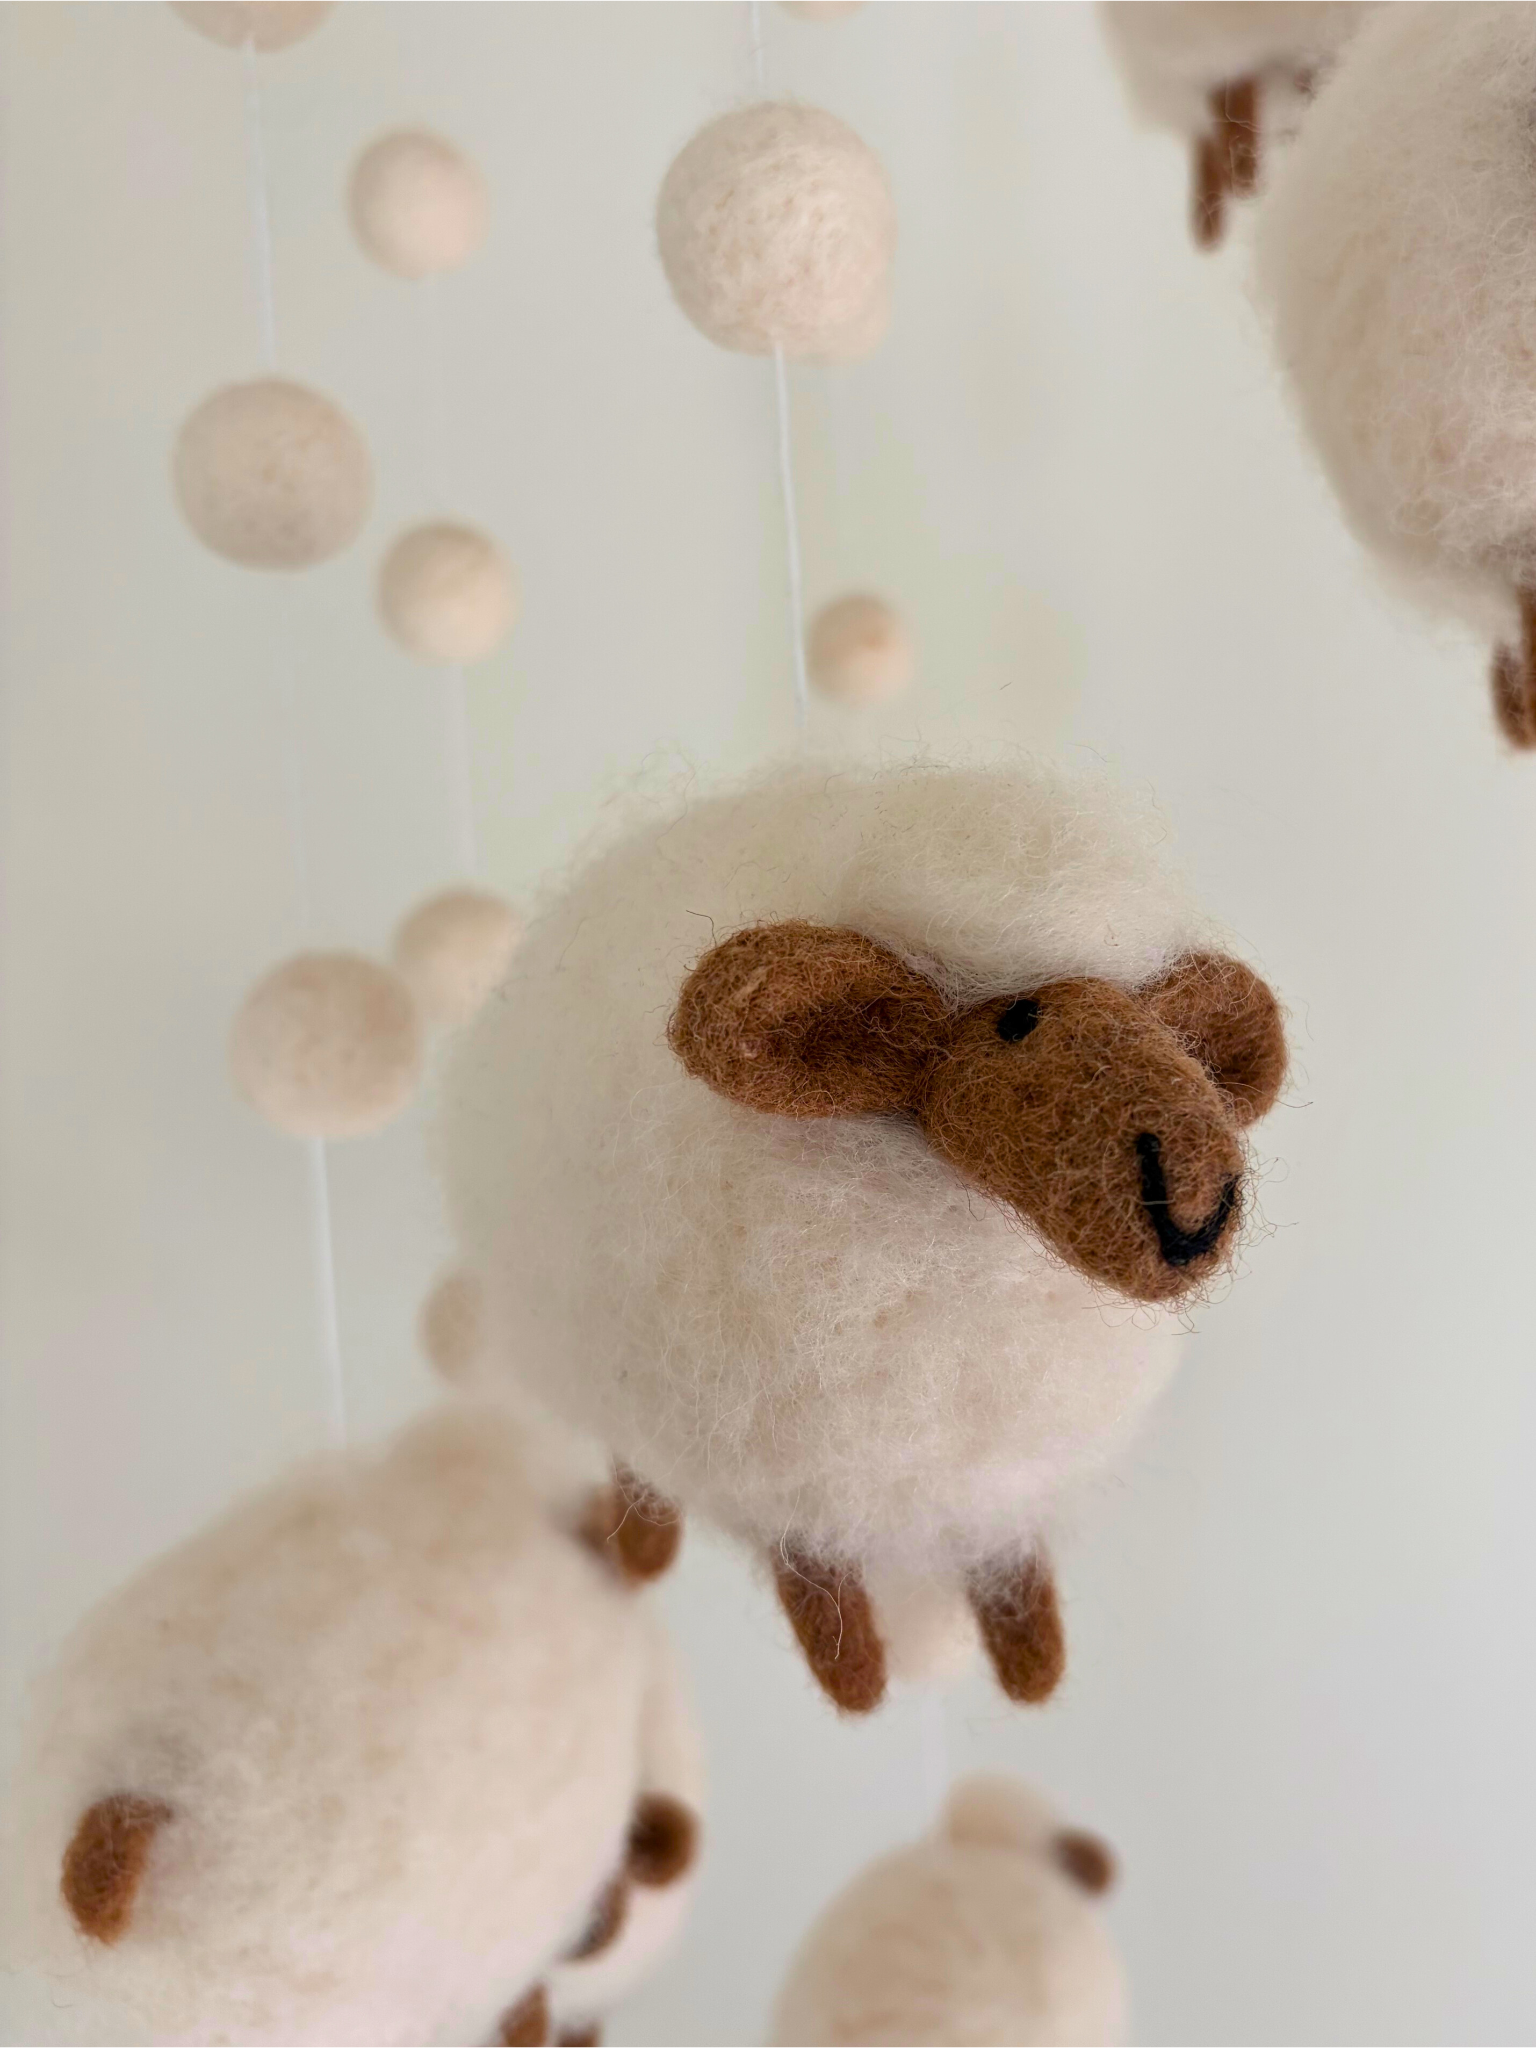
The first step in creating this children’s lamb mobile is making the sheep. I made all seven bodies by using the white wool and shaping it into an oval shape while making sure the top was more rounded and the ends while flatting out the bottom of the body. You can make them as big or as little as you would like and as space allows but I ended up making my sheep about 4 inches long and 3 inches tall.
2. Lamb Accessories and Balls
Once I made the sheep bodies, I moved on to making the heads, ears, feet, and tails. I used the brown wool and opted for the warmer brown tone in the package. In total I needed 14 ears, 7 heads and tails, and 28 feet. I also made the balls that would float above each of the sheep. In total I had 28 smalls balls and one larger ball about double the size of the small balls. The small balls were about an inch and the larger ball was therefore about 2 inches in size. To make the balls I used the same white wool as the lamb’s bodies. All of these pieces along with the sheep’s bodies I needle felted a lot because I wanted them to be firm and hold up for years to come.
Once I made all the lamb pieces, I began felting them onto the sheep. Don’t worry if this looks a little messy because you are going to put more wool loosely over the sheep, but I would still try to keep too much excess brown wool from covering the sheep. When I made the heads, ears, feet, and tails I left a little loose wool at the ends so that I could use that wool to attach it to the sheep. I first attached the heads, then the legs, then the tails, and lastly I attached the ears directly to the head but butting up against the body.
3. Lamb Face Details
After assembling all the sheep, I used black wool to make the faces on each one. You need very little wool. I rolled up very VERY tiny balls for the eyes, positioned them where I wanted them on the face and felted them in. The more you poke them with the needle the smaller they will get.
For the nose I rolled up very skinny strands of the wool and felted one end where I wanted the first end of the nose to be and then felted a small V shape to where I wanted the other end of the nose to be. Any excess wool I had I would either felt back the other way to make a slightly thicker nose or if I was happy with the shape and thickness I would simply cut off the excess. I chose not to do a mouth as the nose gives a lot of character and I did not want the sheep to look too cartoon like.
4. Completing the Lambs
Once I finished the faces and assembled the sheep, I added the wool fur. I very loosely felted on some wool that I softened so that it was airy and loose and not lumped together. I placed it all over the body giving care to cover the areas of the legs and tails where the pieces were felted into the body. Lastly, I added some wool on top of the lamb’s heads. You want to do all of this very loosely and gently but still ensure that the wool is attached to the lamb. (NOTE: This step will come after one piece of the assembly so read below the assembly in it’s entirety to understand when to add the top coat of wool).
Confused?
If any of the creation of the lambs or the balls is feeling confusing then have a look at this channel and specifically this video for sheep creation. She has a multitude of videos that are beginner friendly, great for learning general basics, and even if you are struggling with making the balls she has a video for that. I highly recommend Felts By Phillipa for your needle felting needs for this project or any future projects you may have! I followed the techniques she provided and took inspiration from the sheep video, but still did my own thing to create the exact look I was going for and recommend you do that too. Your project is unique to you and your tastes – my mobile and the creations in Felts By Phillipa videos are just here to give you inspiration and tips on how to create your own crafts.
Embroidery Floss and Lamb Assembly
You will need to piece out 7 strands of the embroidery floss. I laid out all 7 strands and figured out the distance I wanted between where it would hang on the embroidery hoop, to how far down I wanted the balls spaced, and how far the balls would sit above the sheep. There really is no right or wrong here but I chose about an inch and a half between the sheep and the balls. I recommend starting measurements from the bottom of the embroidery floss as the lamb will sit at the very bottom and you will want room to play around with the length at the top when it comes time to attach it all to the embroidery hoop. I had plenty of thread left over for attaching everything in the end.
Once I knew how far apart I wanted all the pieces I began to thread it all together. I had a large yarn tapestry needle lying around that I used to thread the floss through and highly recommend this as it will be challenging to thread it through the thick felt and the depth of the lamb’s bodies with a regular sewing needle. After getting the strand through the sheep I simply felted with a little extra felt the thread onto the sheep’s belly. I made sure that it was really well fixed to the body. I did this step before adding the final wool overlay on the sheep’s bodies.
Embroidery Floss and Ball Assembly
Once I attached the sheep to the bottom of each strand, I started adding the small balls to each one. I laid the strands onto a table and measured out where I wanted to place the ball and then threaded them on using the same method as with the sheep using the yarn tapestry needle. For the first strand I added one ball, for the second strand I added two balls an equal distance apart, for the third strand I added three balls, and so on until I completed all seven strands.
Final Assembly
After assembling all the strands with the sheep and balls attached, I only had the larger ball left and the final assembly to complete. I measured out on my embroidery hoop how far I wanted each strand to be from the next which was approximately 4 inches apart. I lightly marked with a pencil where I wanted each strand to sit and then went through each strand wrapping them 3 to 4 times around the hoop and pulling them tight.
Once all of the seven strands where attached to the hoop I took all seven strands and threaded them all through the large wool ball. It helps to find a place to hang the mobile at this point (or have a helpful and sweet husband to hold it for you like in my case). With the hanging mobile pull down each of the strands so that they sit evenly.
Once the seven strands are even through the large wool ball tie them off in a knot on the bottom of the ball. With the remaining thread on the top of the ball create a loop so that you can hang your mobile and tie it off with another knot at the top of the mobile. If you are struggling with the style of knot and how to create a loop I watched a couple of YouTube videos until I found one that made sense to me.
Lastly, whatever leftover thread you have simply cut off. And boom – you have made your very own lamb mobile.
You Can Do It
You may be feeling a bit overwhelmed, but trust me the directions sound more complicated than they are. If I can do it so can you! By far the toughest part to this whole project is the final step of putting all the strands on mainly because they wanted to get twisted up with one another. Outside of that it was a time consuming project but honestly poking a needle into wool a million times is oddly therapeutic!
I made this mobile before I had started this blog so I don’t have great step-by-step pictures for you, but I do have some pictures I took throughout the project which I have added to hopefully help assist you in making your own mobile. I saved so much money with this DIY project, loved it even more than the mobile that first inspired me, and created a cherished, one-of-a-kind piece my daughter can keep long after I’m gone. The mobile ties her room perfectly together, is beautiful enough to grow with her for several years, and is still sweet enough to be the perfect touch to her nursery and now toddler room.
Looking for More Children’s Room Decor Inspo?
If you are looking for more children’s room decor ideas then check out my most recent post that goes over all the details of my daughter’s bedroom. I also have other decor posts for the rest of the home like finding a perfect rug for your home, and how to give your home a cozy feel with five easy tips. If you are looking for other ways to care for your home I have a free downloadable cleaning checklist to help you keep a clean home all year long. You can download it by simply going to the homepage and clicking on the button “Download Your Checklist!”.
Lastly, for more kid friendly topics check out my recipes for some toddler-friendly recipes and for tips on how to balance parenting and homemaking among a number of other tips on creating a traditional style home life that is great for the whole family.