Have you been on the hunt for a clean and simple homemade sandwich bread recipe?
Maybe you are looking to transition from processed foods to fresher foods or maybe just looking to save a few bucks a week at the store by making more food from scratch. Whatever your reasons this simple homemade no knead white sandwich bread is sure to check your boxes. With this straightforward recipe and only a few basic pantry staples used you can easily begin making your own bread at home that will feed your family by satisfying even the pickiest of eaters and make your basic PB&J feel a bit more elevated.
Why make your own homemade sandwich bread?
A few months ago I decided I wanted to start making homemade sandwich bread for my family. This stemmed from a few things. One was that I wanted to save money on our grocery bill. Bread is something that I can make relatively easily and it’s cheaper to make it than to buy it premade.
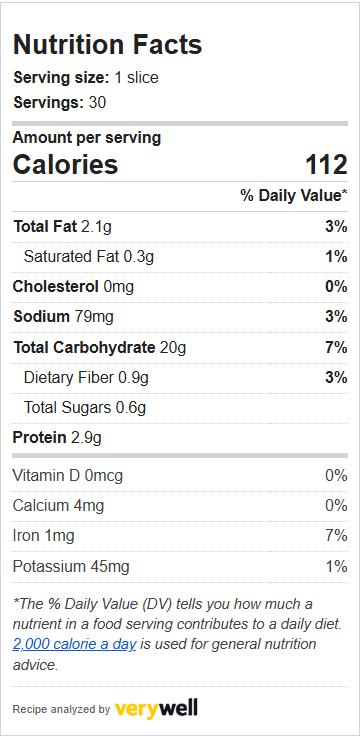
The second reason came from wanting to create a more natural and less processed bread. Making my own bread gives me the ability to make a healthier bread and know exactly what ingredients are in the final product. I like knowing that the bread I am feeding to my family is low in sugar and sodium and has no processed ingredients.
Lastly, I enjoy the fact that I can edit and change the recipe to match our needs. If I want to use more protein-rich flour I can, if I want salty or sweet bread I can make it. The sky is the limit if I ever get a hankering to try something new.
Creating the perfect homemade bread sandwich recipe
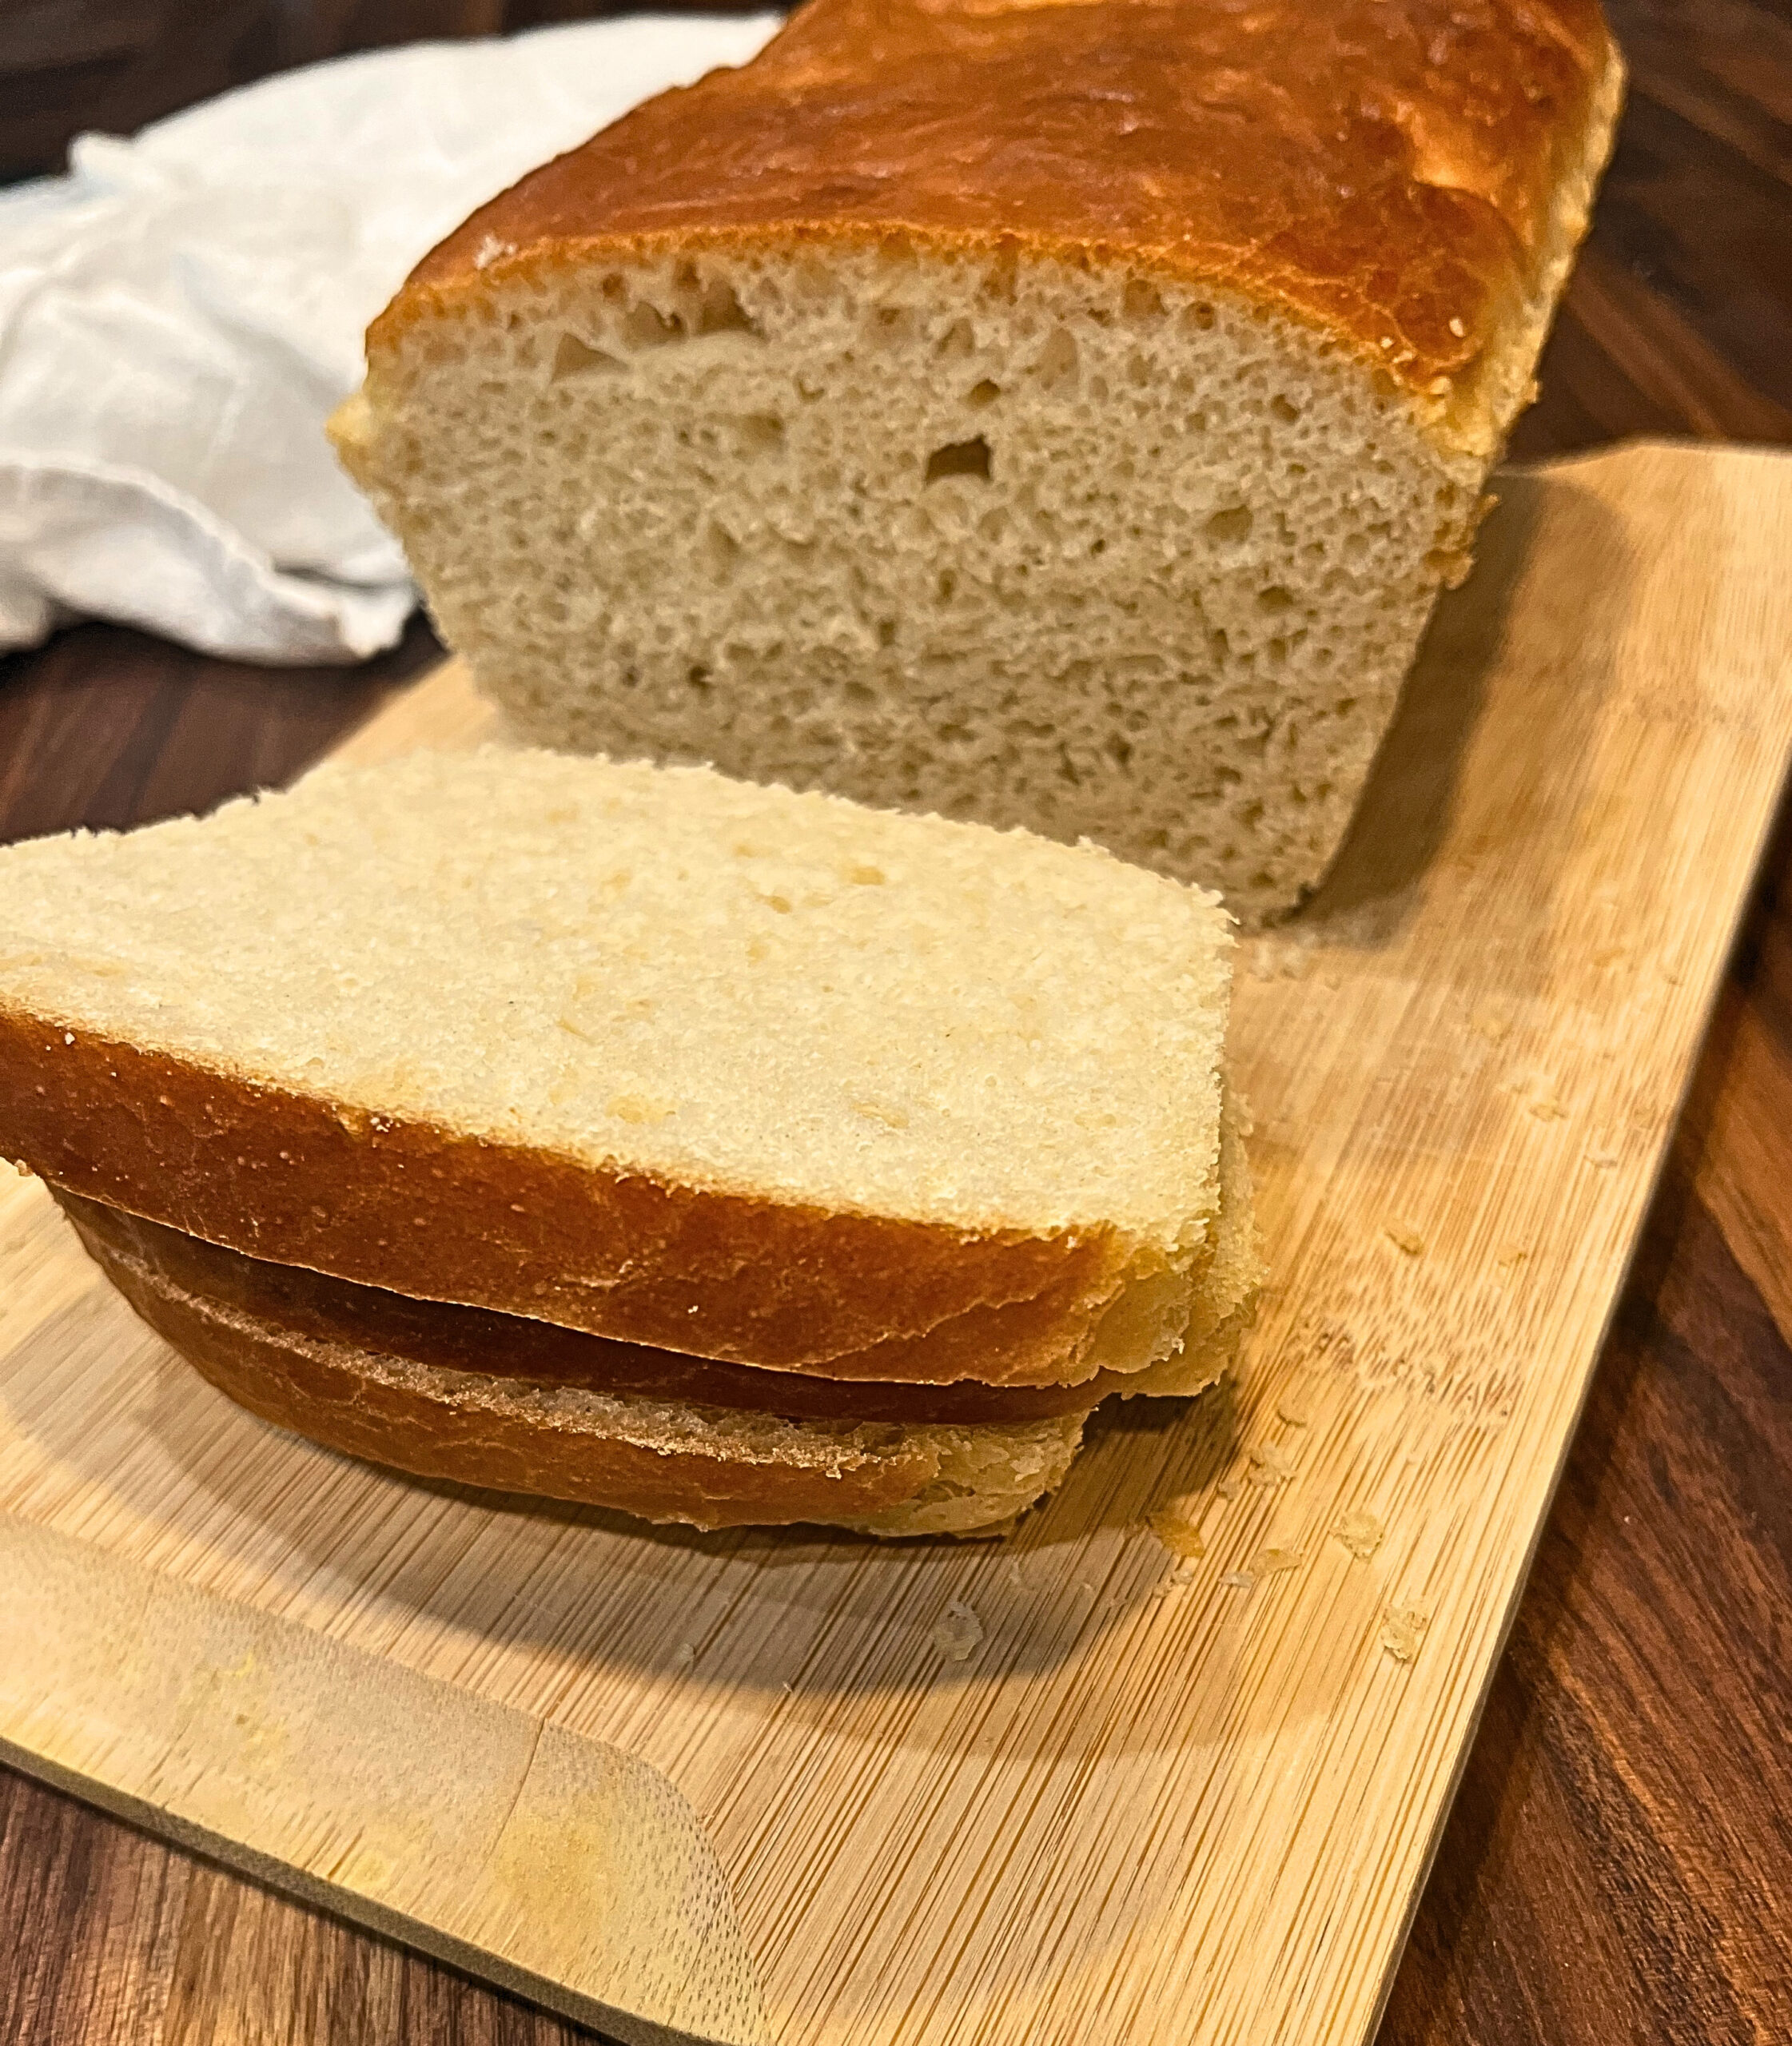
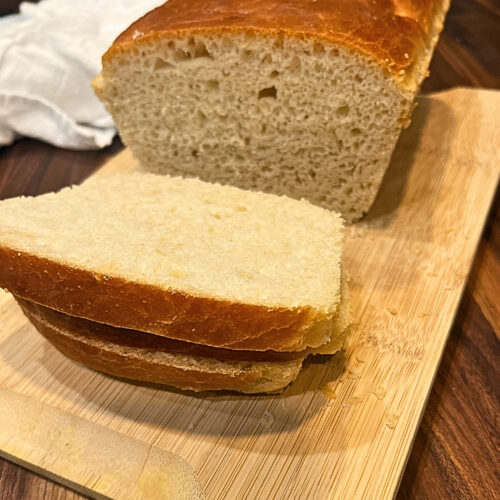
When I first began making homemade sandwich bread I found a recipe online that I liked. It was a little complicated to follow at first but once I figured it out it was one of the simplest and most fail-proof recipes I have tried. I also liked the ingredient list as it was short, and had low sodium, and low sugar. The only negative was that after only a day or two the bread would become really dry and crumbly.
I found a few other recipes online but none of them had exactly the right ingredient list for what I was searching for so I decided to do some research and make my own recipe.
I wanted a bread that stayed low in sodium and sugar, that used a natural sweetener like honey, that was soft and stayed soft, had a decent shelf life for homemade bread, and had a crisp exterior without being too chewy and hard to eat, especially for a toddler as my daughter would be eating the bread.
Apart from the recipe’s ingredients and texture I also wanted to create a recipe that was easy and simple, relatively hands off, and was not intimidating as I have found yeast based recipes to be in the past. Yeast can be finicky and when you throw in the need to knead further complications arise. This recipe is nearly fail-proof, most of the time is spent waiting for the bread to rise versus hands on time so no kneading is necessary, and if you’re a busy mom like me this means you can make bread while tackling all the other things on your to-do list at the same time!
Recipe
Here is the homemade sandwich bread recipe that I created and am pretty happy with! I hope if you are looking for any of these same options in bread or just looking to make from-scratch bread, that this recipe works well for you too!
Ingredients Breakdown:
Dry Ingredients:
- Yeast: I have only made this so far using active dry yeast but I see no reason why you couldn’t use instant yeast you just may need to slightly adjust rising times to be a little less.
- Flour: I have only used white all-purpose flour in this recipe so far. You could likely switch it out with other flours like wheat but know that you will likely need to adjust the ratio of liquid ingredients to offset the different flour types. All-purpose is a common flour used in sandwich bread though so it’s a great choice especially if you’re just starting out in baking bread.
- Salt: I like low-sodium bread but salt is important in the texture and flavor of bread. Because there is not a lot of salt in this recipe don’t expect a super salty flavor like you often find in premade store-bought bread but there is enough to give good texture and flavor.
Wet Ingredients:
- Water: The important note for the water in this recipe is to make sure your water is lukewarm. The best test for this is that it is slightly warm to the touch. Too hot or too cold will affect the yeast but don’t stress too much about getting a perfect temperature because this recipe is pretty forgiving.
- Sugar: You will find that in my recipe once again, like the salt, the sugar is kept to a minimum and I use honey. You could use other sweeteners if you prefer like white cane sugar or other natural sweeteners but I like the subtle flavor and texture honey adds plus the nutritional benefits honey provides.
- Oil: That first recipe I used that made a dry and crumbly bread was lacking oil. After a lot of research, I found that not only does oil give bread a softer crumb but it also gives bread a slightly longer shelf life. I chose to use butter but you could use other oils, such as olive oil, but know that they may give a subtle change in flavor. I also recommend avoiding highly processed oils like vegetable oil.
Optional: Using butter on top of the bread after it’s done baking will soften the crust slightly and add a little extra flavor. This bread has a nice crisp exterior with a soft interior so if you like that don’t add the butter on top. If you still want a shiny and pretty exterior but want to keep the crunch you can do an egg wash instead. See the notes below.
Homemade No Knead White Sandwich Bread
Ingredients
- 3 cups lukewarm water
- 1 tbsp honey
- 2 ¼ tsp yeast (active dry or instant)
- ¼ cup oil or melted butter
- 6 cups all-purpose flour
- 1 tsp salt
Instructions
- Add 3 cups of lukewarm water to a mixing bowl.
- Add to the mixing bowl 1 tablespoon honey, 2 ¼ teaspoons yeast, and ¼ cup oil or melted butter.
- Stir the ingredients together gently just until the yeast is wet and the honey has dissolved.
- Add 6 cups flour and 1 teaspoon salt and mix on low until a soft dough begins to form.
- Continue mixing the dough for about 4 minutes at low to medium speed. You want a wet and sticky dough.
- Take a spatula or bowl scraper and push the dough down and off the sides of the bowl so that all the dough is combined.
- Cover the bowl with either plastic wrap or a tea towel (you may want to use flour on the tea towel or oil on the plastic wrap to keep it from sticking to the dough). Set your covered bowl in a warm place to allow the dough to rise (approximately 1 ½ – 2 hours).
- Take two loaf pans and generously grease them with oil or butter on all sides.
- Once the dough has risen remove the cover and liberally grease hands with oil or butter. With your greased hands punch down the dough and push dough off the sides of the bowl to incorporate all the dough. Separate the dough evenly into two portions.
- Place each portion of dough into the two prepared loaf pans and leave uncovered in a warm place to rise (approximately 45 minutes to an hour).
- Preheat oven to 375℉ while the dough rises.
- Once the loaves have risen to the top of the loaf pans and your oven is preheated (if doing an egg wash you would brush it on here – see notes section below) place the two loaves in the oven and bake for approximately 30 minutes. (Check after about 20 minutes to make sure the loaves are not getting too dark on top. If they are getting dark you can add parchment paper on top to finish baking if the rest of the loaf isn't done or if it's done you can take it out). The loaf is done when you tap the top and the bread sounds hollow.
- Remove the loaves from the oven and if you choose to add butter immediately brush butter on top.
- Remove the loaves from the pans and place them both onto a cooling rack.
- If you choose to pre-slice your bread before storing it or plan to use it the day it's baked wait until the bread is completely cool before cutting which will help the moisture retention in the bread making for a softer crumb versus becoming quickly dry and crumbly.
Notes
Storage
This bread will last out on the counter for approximately 3-4 days. I recommend storing bread in an airtight container such as in plastic wrap and inside a plastic baggie or you can use a bread bag.
If you plan to make extra loaves and want to freeze them then pre-slice the loaf (loaves) and you have two options for storage:
⁃ Use parchment paper in between each slice and wrap the loaf in plastic wrap and then in a freezer-friendly plastic baggie (make sure all air is removed before placing it in the freezer).
⁃ Individually wrap slices or packs of slices you think you will use at one time in plastic wrap and place those individual packs into a freezer-friendly plastic baggie and place them into the freezer after removing all the air from the bag.