Hear Me Out
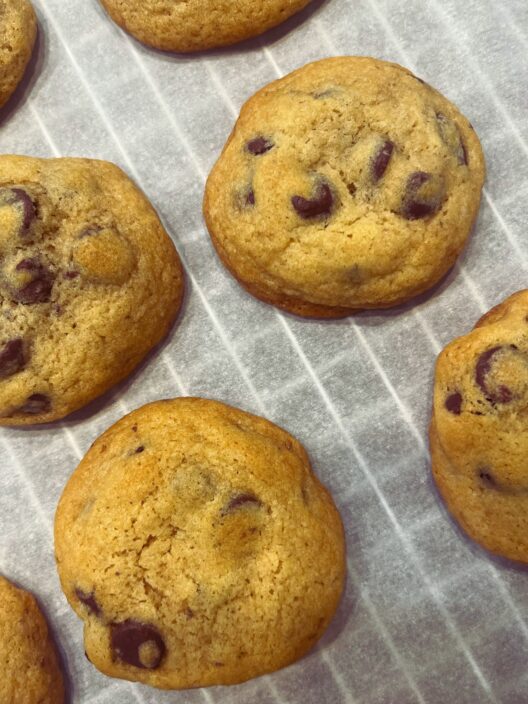
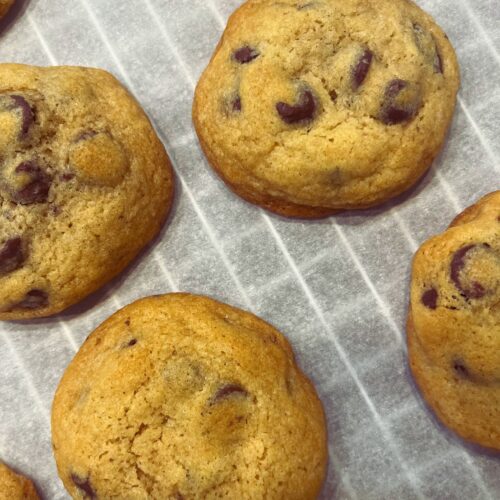
It is a lot to say that the recipe below is the best and simplest chocolate chip cookie recipe, but it is seriously SO good and such an easy recipe. Keep reading to see what makes them so tasty and how effortlessly these cookies come together with pantry staples.
The Vision
If you have ever been to the La Madeleine restaurant and had one of their chocolate chunk cookies, then you will have an idea of what I wanted to create. I wanted to marry the chocolate chunk cookie from La Madeleine with the classic old-school chocolate chip cookie we all know and love. Therefore, when it came to creating this recipe, I knew that I wanted a cookie with rich flavor and a chewy but dense texture. I liked the idea of a thick cookie with chocolate in every bite. I also wanted cookies that would stay soft and chewy for several days, so that dessert was always on hand in our household for a while.
The Basics of Chocolate Chip Cookies
Before I get into the recipe, I want to note a few things about chocolate chip cookies. Most recipes have similar ingredients, but the amounts vary slightly, or maybe have a couple of moderations here and there, such as cold butter versus room temperature, or one egg instead of two. These variations are important, so be sure to read below as I will give you the breakdown of the ingredients I chose to use for these chocolate chip cookies and the reason I implement them the way I do.
Recipe
Here is my recipe for the best and simplest chocolate chip cookies. These are so simple and straightforward to make. My toddler and I make these, and no matter how chaotic things are in the kitchen, these come out perfect every time!
Ingredients Breakdown:
Dry Ingredients:
- Bread Flour: The trick to a chewy and dense cookie is bread flour. Bread flour is just as the name suggests. It creates a bread-like texture as it has a higher protein content and therefore more gluten. This is what gives bread and baked goods with bread flour that yummy chewiness.
- All-Purpose Flour: I did not want the cookies to be too chewy and made to feel tough, so I added in all-purpose flour, which is universally good in baked goods.
- Light Brown Sugar: Brown sugar gives a richer, caramel-like flavor in cookies and also provides more moisture than granulated sugar. This leads to a softer and chewier cookie with deep flavor. You can opt for dark brown sugar, but it will bring a heavier molasses-type flavor to the cookies.
- Granulated Sugar: Mixing both brown sugar and granulated sugar creates the perfect balance in cookies. Granulated sugar provides a slight crunch to the cookie and helps in creating crunchy edges, versus the soft, moist cookie that the brown sugar contributes to. As far as cookies go, this is the best duo.
- Baking Soda: Every cookie needs a good leavening agent, and this is where baking soda comes in. Baking powder leads to a fluffy and cakey cookie, but I wanted a dense, chewy cookie, which led me to choose baking soda over powder in this recipe. In fact, I omitted baking powder altogether. Baking soda adds to the chewiness and rise and spread of these cookies, along with adding to the brown color in the cookies instead of a paler end result when not used. Baking soda does a lot to contribute to the taste, texture, and looks!
- Salt: I love a chocolate chip cookie that leaves just a hint of saltiness behind. It cuts down on the overly sweet taste that some cookies can have and gives that excellent mix of slightly salty and sweet. I use Himalayan pink salt in my recipes, but other salts, such as iodized, should work similarly.
- Chocolate Chips / Chunks: I have made these cookies using both chocolate bars that I chopped up and also using a 12-ounce bag of semi-sweet chocolate chips. You can choose dark, milk, or any other chocolate you prefer, but I love the classic semi-sweet chocolate in these cookies. Two chocolate bars or a 12-ounce bag of chocolate chips ensure chocolate in every bite. Just be sure if you use the bars to chop the chocolate, if you like larger chunks, then use an extra bar or two.
Wet Ingredients:
- Eggs: Eggs do a lot in cookies! They add to the texture, structure, and taste. The more eggs, the moister the cookie will be. This recipe calls for two large eggs, but I have also made it with 3 egg yolks, and they were amazing! The cookies with the egg yolks were much richer and had a deeper flavor and spread slightly less, making for subtly thicker cookies. See the notes section below the recipe if you would like to try the egg yolk version of the recipe for something a little more decadent. This recipe calls for eggs that are at room temperature. This allows the eggs to blend better with the other ingredients they are being added to, leading to a smoother batter and creating a fluffier cookie in the end.
- Vanilla Extract: What dessert item doesn’t have vanilla extract in it? It seems like this is the universal addition of choice in almost all baked goods, and this cookie is no exception. I add a good amount for flavor and for moisture, as bread flour requires a little extra liquid than all-purpose.
- Butter: You might think I am crazy, but I prefer to use salted butter in a lot of my cooking and baked goods. I find that it provides so much more flavor! I mentioned earlier that I like my chocolate chip cookies to have just a slight hint of saltiness. Don’t worry about the cookies being too salty; they are far from that, but they have a nice balance that keeps them from being sickeningly sweet. The salted butter, along with the salt in the recipe, is the perfect amount of salty to the sweet. Make sure that you use softened butter, but not too soft. You want it to be just soft enough that you can push your finger tip in and it will slightly indent, but it should not feel super soft like your finger sinks into or slips on the butter.
The Best and Simplest Chocolate Chip Cookies
Equipment
- Stand Mixer
- Baking Sheet
- Ice Cream Scoop (1 to 1½ Tablespoons in Size)
Ingredients
- 1 cup Salted Butter Room Temperature
- ¾ cup Light Brown Sugar Packed
- ½ cup Granulated Sugar
- 2 Large Eggs Room Temperature
- 2 tsps Vanilla Extract
- 1½ cups Bread Flour
- 1 cup All-Purpose Flour
- 1 tsp Baking Soda
- 1 tsp Salt
- 12 ounces Semi-Sweet Chocolate Chips / Bars
Instructions
- Preheat the oven to 350℉ and line a baking sheet with parchment paper and set aside.
- In a stand mixer beat on medium speed butter and the brown and granulated sugars together for approximately 5 minutes until creamy and slightly light and fluffy.
- Add eggs and vanilla extract to the butter and sugar mixture and mix on medium speed just until the eggs and vanilla are incorporated.
- In a separate bowl mix together the bread flour, all-purpose flour, baking soda, and salt.
- Add the mixed dry ingredients into the sugar and butter mixture and blend on medium speed until just blended.
- If using chocolate bars, chop up the chocolate into desired sizing.
- Add the chopped chocolate or chocolate chips into the mixing bowl and stir gently on low speed or by hand just until chocolate is incorporated.
- Using a 1 to 1½ tablespoon sized ice cream scoop, scoop the dough into balls and place on the prepared baking sheet approximately 2 to 3 inches apart.
- Bake in the oven for 8 to 10 minutes or until edges are beginning to brown.
- Once done baking allow the cookies to cool on the baking sheet for approximately 5 to 10 minutes and then transfer to a wire rack to finish cooling.
Notes
There you have it! Tasty, chewy, rich, and delicious chocolate chip cookies with chocolate in every bite. They store well for several days and are easy to make. The biggest tips I can give are to properly measure your flour, make sure you use the right temperature of ingredients, and enjoy, enjoy, and enjoy.
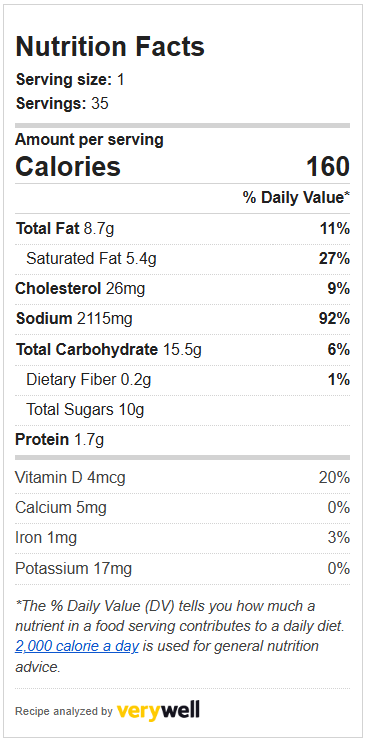
*Nutrition is an estimate
If you are looking for more baking recipes check out my Homemade No Knead White Sandwich Bread here. Don’t fear if chaos is in your kitchen after a couple days of baking, because I have you covered there too. Be sure to sign up for the email list where there is a cleaning checklist freebie waiting for you to help take care of whatever kitchen mess may be left behind. You can sign up by clicking on the “Download Checklist” button on the homepage here, or throughout the website.